Thursday, February 13, 2025

Product Review: Fujidenzo Inverter Refrigerator (INR-83HS)

We just recently said goodbye to our almost-10 years one-door Condura Refrigerator. We decided to give it away because of the weekly thick ice build up in the freezer. It was such a hassle to defrost and clean that fridge every week.

Our new fridge is the two-door Fujidenzo Inverter Refrigerator (INR-83HS).

Fujidenzo Inverter Refrigerator
Fujidenzo Inverter Refrigerator INR-83HS (Source: Fujidenzo)


We chose a two-door fridge to separate the freezer from the rest of the fridge. The reason for this is that we can clean the freezer and other compartments of the fridge separately.

Our Fujidenzo Inverter Refrigerator boasts of a “no frost freezer”, which means that there will be no ice build up in the freezer. Our new Fujidenzo fridge is taller and has more space than our old Condura fridge.

Fujidenzo Inverter Refrigerator Review

The “no frost” feature of our Fujidenzo Inverter Refrigerator really works. There is no ice build up, thus there is no need to defrost our fridge every week. This less hassle and chore for us.

The other compartment of the Fujidenzo fridge functions the same as other fridge models and brands out there in the market.

Fujidenzo claims that our new Inverter Refrigerator is more energy efficient than our old Condura fridge. I am not sure if it is true since I cannot quantify its impact on our monthly electric bill.

We bought our Fujidenzo Inverter Refrigerator fridge for 19,000 pesos full cash payment. We purchased it from an appliance store and had it delivered to our home. I am OK with the price of this fridge.

We are happy with our Fujidenzo fridge. It saves us time and effort because there is no need to defrost the ice build up every week.

Our main and only complaint with our Fujidenzo fridge is the lack of door handle that made it very difficult for us to open the fridge door.

Do you have a Fujidenzo fridge? What can you say about it? Tell us in the comment box below.

.

Friday, December 6, 2024

Malabanan Sipsip Poso Negro Review

Malabanan is synonymous with “sipsip poso negro”. These two terms stick to the point that Filipinos will search for Malabanan whenever they have a septic tank problem.

That’s why when our toilet bowl was clogged I also called Malabanan for help twice. Sadly, our experience with them was very bad as if we were being scammed.

Malabanan Poso Negro Review

Our Malabanan Sipsip Posonegro Experience

We first contacted Malabanan about a year ago. They opened the septic tank and sucked out something in less than 15 minutes. They insisted that they will dive into the septic tank by adding 10,000 pesos to the fee. We did not take their offer so they just left.

What we didn’t know back then was that Malabanan did not remove the filter of the septic tank so they did not really suck any poop or clog in the tank. They just robbed us of 5,000 pesos.

The clog persisted and we had a hard time flushing our toilet bowl even though I poured liters and liters of liquid sosa and muriatic acid.

I decided to open the septic tank on our own. That’s when we discovered the filter and the trick of the previous Malabanan crew.

We removed the filter and saw that the septic is already full of decayed poo. I had no other choice but to call another sipsip poso negro company. We agreed for a payment of 3,500 pesos for the sipsip poso negro service.

It is the previous Malabanan crew that came much to our disappointment. This Malabanan crew were visibly disappointed when they saw that the septic is already open and the filter already removed.

They started sucking the waste but suddenly stopped midway claiming that their machine can no longer suck the mud. They insist on diving in the tank for an additional fee of 10,000 pesos. The Malabanan crew is acting unprofessionally by that point and intimidating us. We stood our ground. My father inspected their machine and discovered that they turned it off that’s why it can no longer suck the waste and mud inside the septic tank.

Angry at discovering their trick, the Malabanan crew switched on their machine, sucked the remaining contents of the tank, and then left like a band of sore losers.

Our Verdict on Malabanan’s Sipsip Poso Negro Service

Malabanan’s sipsip poso negro service is terrible. Their crew are very unprofessional. They also resort to petty tricks just to scam their customers. I will never trust Malabanan ever again and will look for a company that can provide good sipsip poso negro service.

.

Sunday, April 28, 2024

Paano Linisin ang Iyong Window-type Aircon? (Do-it-Yourself Cleaning)

Summer ngayon at talaga namang nakakrindi ang init! Kaya naman marami nang Pinoy ang gumagamit na ng aircon para makatulog nang mahimbing sa gabi.

Ang isang problema lang sa aircon ay ang naiipong alikabok at dumi sa filter nito. Ang resulta ay pagyeyelo ng aircon na pumipigil sa pagpapalamig ng kwarto.

Isang gabi ay nagyelo ang aircon namin at di na gumana. Nagkontak ako ng technician para maglinis ng aircon pero dahil sa busy sila ay mapupuntahan lang nila kami after three (3) days. At dahil dyan napilitan ako na mismo maglinis ng aming aircon.

Para sa inyong impormasyon, ang aking aircon ay window-type Panasonic aircon.

So paano ko nilinis ang aming aircon? Simple lang at heto ang step-by-step na proses ng do-it-yourself (DIY) na paglilinis ng aircon.

DIY na Paglilinis ng Aircon

1. Ihanda ang iyong mga gagamitin tulad ng hose, sprayer na halo ng tubig at detergent. Ang aking ginamit ay liquid dishwashing detergent.

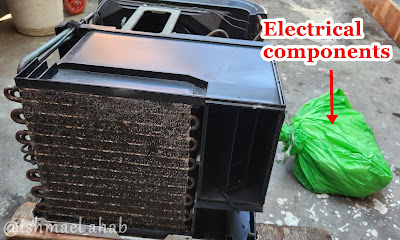
2. Alisin ang cover ng aircon at ibalot ng plastik ang mga wirings at electrical components.

DIY Cleaning ng window-type aircon

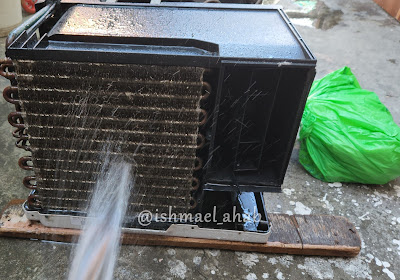
3. Tirahin ng tubig ang filter at coil gamit ang hose. Ang purpose nito ay para maalis ang kumapit na alikabok sa aircon. Tirahin din ng tubig ang fan at iba pang parte ng aircon upong maalis ang alikabok at lumot.

DIY Cleaning ng window-type aircon

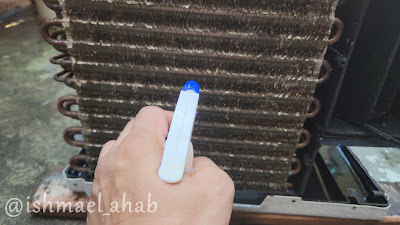
4. I-spray ang detergent mixture sa filter at coil. Siguruhin na ang buong filter at coil ay ma-spray. Hayaang nakakabad sa detergent mixture ang filter at coil nang 30 minutes upang makatulong sa pagtanggal ng pagkakapit ng namuong alikabok sa aircon.

DIY Cleaning ng window-type aircon

5. Tirahin uli nang tubig ang filter at coil upang mabanlawan at maalis ang detergent mixture. Siguruhin na tuluyang mabanlawan ang sabon.

6. Patuyuin ang aircon at punasan ng tuyong basahan ang extrang tubig.

7. Ibalik ang ang electrical components at switch ng aircon. Ibalik na din ang cover, housing at filter ng aircon.

8. Ibalik mo na uli ang aircon sa kanyang lagayan sa iyong kwarto.

9. Paandarin ang aircon upang ma-test kung gumagana at maglalabas ng malamig na hangin.

At yan ang 9 na easy steps sa paglilinis ng aircon.

Mga Paalala sa Paglilinis ng Aircon

Heto ang dapat mong tandaan upang maging success ang DIY na paglilinis mo:

1. Siguruhing kayang buhatin ang aircon. Magpatulong sa mga kasama sa bahay kung hindi kaya ang bigat.

2. Huwag gumamit ng suka o acidic na kemikal na corrosive sa mga metal parts ng aircon.

3. Huwag gumamit ng bleach o kemikal na may matapang na amoy na makaapekto sa ilalabas na hangin ng aircon.

4. I-check kung may tagas ang mga tubo ng aircon. Kung meron ay kailangan mo nang ipatingin sa technician ang iyong aircon.

Heto ang lahat ng aking tips sa DIY na paglilinis ng window-type aircon. Panoorin ang ginawa kang video bilang dagdag gabay:


Kung may tanong ka then mag-iwan ka ng comment o i-messgae mo ako sa Facebook. Follow mo na din ako sa Youtube.

.